Thursday, April 27, 2017

Contemplations on the Monolith

Derping Our Way Through a Build...


by: George Argyropoulos
a/k/a Dragon_Bane   

NEWEST BUILDhttps://forsakencove.blogspot.com/2017/05/preview.html


This one is going to be a bit... odd. We aren't yet sure what exactly the Elite targets are going to look like for the next Raid, we have rumors of a buff coming, but no substantive information concerning this and we have a lot of math kicking around with regard to comparative damage numbers between the Harlock Citadel / Citadel combo and the Gridiron Monolith / Monolith combo - of which could possibly be negated with a buff to the latter combo.


First we have to make some assumptions, which I hate, but must be acknowledged due to DoomRooster's tease on the forums. The idea of a buff seems to revolve around the damage calculations mentioned above. Currently the R5 HCit/Cit combination out performs the GM/Mono combination with regard to DPS (Damage Per Second) and is likely the issue that will be addressed. We do not know this of a certainty but it seems the most likely item that needs addressing with the latter combination. The following build is centered around this premise.

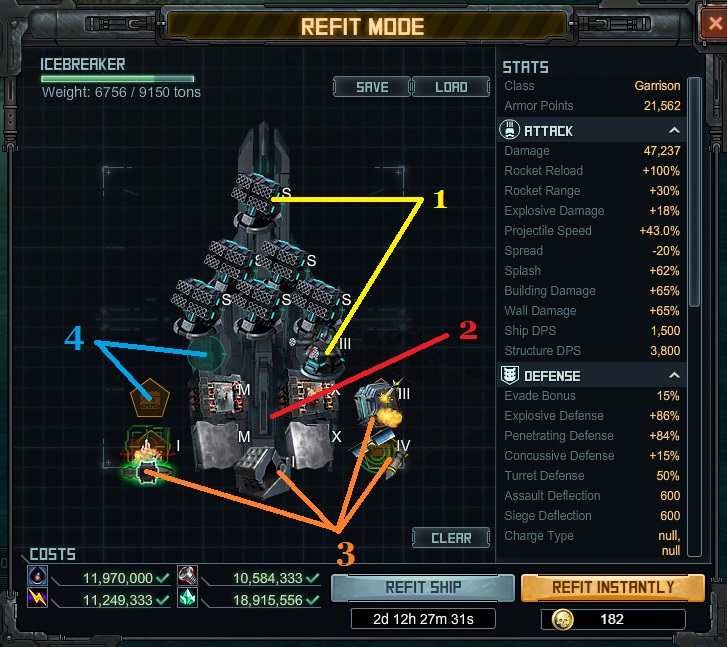
So, for reference, this is the build we will be discussing today. The build is a little different than traditionally presumed because of the mechanical way I have designed the fleet to offset stack when driving.


Gridiron Monolith :


The Flagship of the fleet, this is designed, as apparently intended, as a Tank for the rest of the fleet. Some of the items may seem an odd selection. Given the mechanic of the Flagship bonus of this hull, I designed the fleet to offset stack as you drive it so that this hull will always pull just a hair forward once you move out from a full stack. The addition of the Cryonic Depth Charge pulls the speed of this hull up to 41.12 combat speed. This will inch the hull forward from the rest of the fleet allowing the following Monoliths to gain the bonus associated with the Gridiron.

The countermeasure selection is mostly traditional with one Hailstorm D to offset the cycles and ensure constant coverage from mortar fire. Three Phalanx 4s for missile fire, though that may need adjusting depending on the targets we see. Additionally, the slot used for the Evade Upgrade initially had High Velocity Rounds to possibly help destroy incoming fire faster so that less would 'sneak by' due to proximity or angle to the fleet, however, in reviewing some of the videos, it did not seem that fire was getting close enough to the fleets to necessitate that quirky mechanic... yet.

Given what we saw in the last Raid, the Harrier missile with the SFB3 special should ensure a safe cushion of space when targeting the turrets in the targets. Given the basic idea of standing off the target with this set-up the armor selection was relegated to mitigate as much missile damage as possible under the theory that you will not get into the range of the deadly Coldsnaps. Likewise the selection of the Evade specials.

The rest of the selections should be self-explanatory given the role of this ship in this fleet design.

Monolith DPS Hull :


The DPS version of the hull, this is designed around the Combat Mortar O/U-10. Again, the basis for this derives from the presumptions made with regard to the possibility of a buff coming. There is no 'right' build here and much of this is personal preference. Additionally, here you must decide if you are going to run four DPS hulls or opt for a trailer tank.

The speed of this hull is designed such that it has a combat speed of 41 letting it barely trail behind the Gridiron flagship starting from a full stack so that it will take advantage of the field that trails behind the Gridiron.

Again we see a concentration on missile damage mitigation. Given the role these hulls play in the fleet, they should hopefully never see any explosive damage issues (given what we have seen of the targets thus far).

This build concentrates on broad damage while trying to find a balance between splash, projectile speed and spread. With a splash of just over 42 and a calculated spread-from-center of 24, this seems like a good overall compromise.

Monolith Trailing Tank :


This is the Trailing Tank option. Not knowing exactly what we will face, this is the last hull to build - possibly having a blank built and set aside to decide between a fourth DPS hull or this option and holding build tokens in reserve. The DPS build above will fit in this fleet for the fourth slot if you choose to go with four DPS hulls.

Again we use the Harrier as a spotter. This will enable you to 'shift-click' targets if you are engaged on both sides. This build is also designed to mechanically trail behind the DPS hulls by means of a combat speed of 40.4. The selections are much like the Gridiron tank. While I am unsure of the necessity of this hull as yet, I have planned it out 'just in case'.

These are my current musings on the Monolith line of hulls currently. To be honest, I will not be fully decided upon the builds and interactions until we have the actual raid. Generally I would say not until a Preview Server, if we are going to have one, but given the result of the last Preview Server with regard to the Icebreaker build, I am leery of making final decisions based on those now. I dislike being burned and, right or wrong, that is the feeling I had after last raid. I hope these designs inspire some ideas of your own. Good luck!!


Thursday, April 20, 2017

Espionage Take-Away

Flog the spies...


By: George Argyropoulos
a/k/a Dragon_Bane   

So, I took some time to let this steep in my brain before I wrote it. I want to be clear, on the whole, this was a fabulous raid. I just have one major problem with it that is a very serious one given the circumstance. I want to address that but I do NOT want to detract from the overall good that this Raid Set seems to bode for players.


Let me begin with the positive side. This was one of the most versatility engage-able raids we have had in a long, long time. This is a fantastic aspect to have, given the final intent of the targets.

Players were using fleets that included everything from Monoliths to Tideseekers to Sea Wolves. There were multiple avenues in which to engage and grab some points. Additionally, if you had a spotter and a tank and a friend with Icebreakers, prepping was pretty damn easy and you could help other players out by easing the burden in the targets.  If you had the time (and that was an issue given Easter) and a current FM fleet, you could do relatively well in terms of points. It did seem to take some time to get that word out, but I think they pulled this off well.

Even better, this bodes very well for mid-level players for the FM change to follow this raid set. While they may not be able to engage the biggest targets, they will undoubtedly have more opportunity to achieve higher levels in the FM. This is all sorts of fantastic for the players and for the game. Clearly, we don't know this of a certainty as yet, but I will remain optimistic as Kixeye has shown an acknowledgment of the necessity of the FM for players to remain engaged and relevant in the game. In furtherance if this, the Zelos made an appearance in The FM this week. Better and better. I love this aspect of this Raid Set and the forethought Kixeye seems to be having with regard to the FM. A++!!

The bad? The Icebreaker. The Icebreaker now has the record for the shortest length of applicability for a rocket blitz hull. It was stillborn. To say that this infuriated me would be a serious understatement.

I am clearly aware of the differences between a preview and the live environment in this game and the reasonable changed spawned in the interim that is to be expected. I could expect some changes to the targets, difficulty or damage - at least a reasonable amount. The targets we engaged in the Preview Server, in my opinion, were a fair balance for the Icebreaker. You had the option to drive it like a skill hull, or drive it semi-blitz and take some damage, or outright blitz the target. The hull was FUN. This is what it looked like in that preview server when you chose the middle path:


What I, and many others, did not expect was a fundamental change in the use and effectiveness of the 120 million point 'auto' hull. A rocket hull, by its very mechanical nature, is a blitz hull. It should be ideal for autoing a Garrison target. Instead, the Icebreaker had to be driven with the skill and finesse of a 'skill' hull. To drive it as such was even harder than driving the Hellwraith its Raid Set. This was not 'fun'.

I very much literally said 'What the actual fuck!' after engaging the first target. The targets were changed to where the fundamental design of the icebreaker no longer worked as it had been in the preview server, nor how one would reasonably expect a rocket hull to perform. This is what the A set looked like:


There were no options, you had to drive it as a skill hull, OR, relegate it to a lowly prep fleet like so:


This was not just an increase in difficulty and damage, but rather a change that negated the fundamental basic usage of a blitz hull. (And if this was intended, why even spend the time to fix the Trident? This change essentially negates their very usage.)

Rocket hulls, even in their use as an auto hull, are foundationally a blitz hull. That has been their design intent since the inception of the game. Lay waste to a large swath of area quickly whilst shrugging off damage. This is what we saw in the test server, however, in the live environment we saw anything but this. The fact that a bloodthirsted Tideseeker did better in that role speaks volumes about the issue. In fact, I decided to try the new 112 FM target out with the Icebreaker. This target had been stated as designed for the Icebreaker and Monolith. This is what happened with only 2 very minor errors. Seriously?? 5+ hours of damage:


The community expected a lesson to be learned from the abomination of the Ironclad. Clearly that lesson was not learned. Again, I find myself building two fleets for a Raid Set. I truly hope this gets looked at and adjusted accordingly because it is a huge breach against the community and really, the only real negative of a well balanced raid. I would have happily spent the same amount of coin as I did in the raid to be able to drive as I did in the test server. It was fun and quick. Instead I had my Icebreakers relegated to either driving like a bloody skill hull or using it as a lowly prep fleet and had my seat time increased significantly because of it. Oh.. and a 120 million point prep fleet?!?  C'mon.

Correcting this one issue will not negate the brilliance of the rest of the Raid set and the options players have been allowed, it will merely engender some good will from a community that feels a bit betrayed given the cost investment to have had this fleet out for the first iteration of this Raid Set (and allow for its reasonable use in the FM).

Tuesday, April 18, 2017

Stoke the Flames! Foundry 2.0 and Update!

Bringing the Fire back to the Foundry


By: George Argyropoulos
a/k/a Dragon_Bane   


Foundry 2.0 :

The Foundry got a HUGE makeover today which looks to help players get into relevance quicker in the game so that they can succeed in the PvE aspects of the game expeditiously and, hopefully, with some alacrity.

The biggest change to the Foundry is the removal of any necessity of requirement for fragments or components. This means that you don't have to endlessly hit a bazillion things just to get your next upgrade going. Instead, all Foundry technology will be available through timed research.

This also means that the World Map targets will no longer drop these fragments. Does this bode well for all those 40 Salvages to start disappearing? Will our map become cleaner? I hope so. At the very least, this will open the door to that discussion. As a prelude to this the Legion Assault Forces will no longer be spawning on the World Map, hopefully alleviating some of the memory bleed issues players have with heavily scrolling around on the World Map.

In addition to these changes, Kixeye is helping ease the transition by giving away tech in the Tier 1 - Tier 3 trees. If you are a level 30 or above with at least a level 1 Intelligence Lab, you will find all Tier 1 - Tier 3 Foundry Hulls and Blueprints in your inventories. Even better yet - these hulls have been automatically upgraded to their maximum retrofit level for you at no cost! (Side note: This does NOT mean you have to build them!!!!) New players, or those that do not qualify for these freebies will NOT be granted them in the future (as of this writing).

The flip side of this is that all Tier 1 - Tier 3 blueprints will be discontinued going forward. This may annoy some collectors, however, since the Foundry will be starting off at Tier 4 tech levels, it really is a moot point as Tier 1 - Tier 3 tech is essentially obsolete in today's game and likely won't really help anyone advance in the FM or TLCs. Additionally, the window for the Foundry will now also show recommendations for complementary weapons and/or specials for each hull. Of further note - the timed research is... long in some instances. I'm not sure how that will pan out going forward, but for now, some of the research times (Citadel) are going to be a 'time investment'! On the plus side - you can research as many of them as you want concurrently so as to avoid a bottleneck in the process of 'catching up'. Good choice here, kudos!


They also have gone ahead and completed your current Tier 4 or 5 hull research for you. If you are currently working on Tier 4 or Tier 5 Foundry tech, they have granted you the next hull in your progression OR the next retrofit level. Which one is dependent upon your current progress.

The example Doom supplied looks thusly:


  • If you don't own blueprint X (Tier 4), congrats! Now you do!

  • If you do own blueprint X (Tier 4), we gave you blueprint Y (Tier 5). Congrats!

  • If you own both, we upgraded them to the next retrofit for you. Congrats!

  • We did this for all classes in the Foundry. (Garrison, Siege, etc.)

What does this mean for the Gantry and Hyperion? Same thing! No fragment requirements. Timed research.

Update :

We were all hoping for at least a 2 day token to get some builds out for VXP weekend, right? Well, unfortunately, that will not be happening this week as we have a load of new prizes in the FM, two of which are in Prize Pool 4 'blocking' a 2 day token this week.

Of serious note is the addition of a new target to the FM that is intended for the Icebreaker or Monolith. At this point all we can do is speculate as to its difficulty, but the point pay out should be the same as the current 109 FM target and in addition it will pay out a Reinforced Chest that may contain VXP tokens for the Icebreaker or Monolith. I like that part, though I would wildly like it if there were some small possibility for build tokens for those hulls as well (hint, hint!!!!).

  • Prize Pool 5


Not exactly sure about this special as yet unless a blitz hull is coming out. The way it reads is that the hull has to be in range of this special for the special to have an effect on the projectile speed. At the moment, it gets a 'Meh'. It would be interesting to know if the effects stack and how that would impact a blitz fleet. To be continued...


This should be an interesting addition to the toolbox. Lower splash and spread with a massive increase in ship damage, this is offset by, contexually, de minimis wall and building damage. This should relegate this weapon to Fleet v Fleet use. Pride as a defender now? Hmmm....


A complementary special for the weapon above, it also can be used for your 'other' Pride builds. In addition, that low 12% weapon weight means this can take the place of the 19% weapon weight costing Barrel System 3 or Emissions Generator in some builds, saving you weight!


  • Prize Pool 4

Before anyone gets too excited at the two additions into this Prize Pool, please note that both of these are sadly relegated to the Generalist classification. <Insert sad, sad face>


Like the special, I am not thrilled with this addition. Barring some other way of increasing range, I would avoid building a rocket Generalist Class hull. 'Meh'.


Oh how I wish you would fit on my stillbirthed Icebreakers. How I wish... Again, much like the special above, this seems odd for a Generalist Class hull. I'm not sure the Splash Damage Reduction is enough to offset running into the teeth of a defense, so I'll still pass on building a rocket Generalist for now.

One additional note of interest was this line:


  • Unidentified Raiders 101 (similar to May S-target) will only spawn from Fri, 9am - Sat, 9pm.


This will be interesting to see and play with. I think many players may be hitting these targets with fleets already skulled to get an idea of what to expect- just bear in mind the egregious changes form the last test server to the live event.


And that's a wrap folks! Hope you enjoyed it!


Bow Down to the RNG!

How RNG REALLY Works...


By: Brian Randich
a/k/a Brian_R


Brian has come out of his corner and decided to write his first article!  Now with 120% of your daily value of math!  Okay, so it’s more like 500%.  But, perhaps, you will learn something about basic statistics which you can apply to other things in life.  Like video games, which is probably the last place anyone thought they would ever use something they learned in school.  But that’s what I do:  I destroy your dreams and tin foil hat conspiracies with math and science!!  Since I already destroyed “109’s are doing more damage this week than last week,” it’s time to tackle the second popular conspiracy theory:  rolling for rogue crews.

Over on another "blog", a player did some simple experiments with rolling rogue crews to observe an approximation of how often they would come up.  The key word is approximation.  Every roll is different, and every roll is independent of the other rolls.  The second part is key, and is called the “Law of Independent Trials.”  You can roll a die 20 times and get no 6’s, but the odds of a 6 coming up the 21st time are exactly the same as the first 20 (unless you have a loaded die, but that’s cheating.  No cheating.  Bad!)  Also, yes, the crew you get always lands RIGHT BETWEEN THE TWO CREWS YOU WANTED OMG!  That is a psychological ploy to make it more attractive to keep rolling since you were SO CLOSE to that Grease Monkeys crew.  In practice, that rarely matters, as you’re going to keep rolling until you get what you want or run out of uranium anyway.

My major issues with the article (other than the simple failure of basic math, as 170+226+391+403=1,190, rather than the stated 1,447) are 1. the attempt to take this or any sample as gospel and 2. some faulty conclusions.  The Law of Large Numbers states that the average of the results obtained from a large number of trials should be close to the expected value, and will tend to become closer as more trials are performed.  If you flip a coin one time, or ten times, or a hundred times, you could get landing on heads every time, or at least far more than half.  Do 1,000, 10,000, or even more, and you are likely to come out closer to an even split of heads and tails.  Even a sample like this, over 1,000 rolls, can hardly begin to determine the actual probabilities (including the Disciples of Skullduggery crew, but more on that later).

Now we tangent to talk about the binomial distribution, as it’s going to be very helpful here and can also help determine the minimum amount of evade needed to avoid a certain number of missiles given their chance to hit, which needs their accuracy and your evade to calculate chance to hit, the number of missiles, and the number of hits, or how to avoid a shockwave building up on your Prides.  The binomial distribution is a way of computing the chance of getting exactly k successes in n trials with a probability of success p.  It looks like this:


Why does this matter?  We can use this to determine just how likely some of the rolls in this sample are.  

In the overall sample, a Bullseye Brigade was only found 3 times.  Even counting this against their own total, this has a 22.43% chance of happening, based on the above equation.  Small chance, isn’t it?

In addition, since you can store enough uranium to do 409 rolls, let’s do the math that you’ll get a Bullseye Brigade crew in a full stock of uranium, assuming the odds of 3/1447 (0.21%) to get one are correct:

P(getting at least one BB) = 1-P(getting no BB’s) = 1-binompdf(409,3/1447,0) = 0.5721

You have a 57.2% chance of getting a BB crew when you roll a full WH of uranium, if their math is right.  If you believe the math is right, your chances of getting some of the rarer crews are just that:  rare.  Nobody wants to sit there and roll nearly two full stores of uranium for a reasonable chance at one rare crew.  If you go with the Law of Large Numbers instead, you do not put faith in this math as a representation of the actual chances.  

My other main concern is with some of the conclusions.  From said article:

“Here are the averages that matter:
  • 37% for rolling a Common Crew 
  • 61% for rolling an Uncommon Crew
  • 1.5% for rolling a Rare Crew 
  • .41% for rolling a Legendary Crew”

Not exactly 100% due to rounding, but that happens sometimes, no big deal.  Combine this with the following statement, and we have a problem.

“But the biggest shock from it all?
  • The average chance of rolling a common crew is higher than an uncommon crew.”

That is not a shock.  That is how English works.  It should be more likely to roll a common crew than an uncommon crew, even across particular types of crews.  It is also a bit misleading when paired with the above statistics, but is explained more clearly when comparing common crew rolls to uncommon crew rolls.  Again, this is how things should be.  A particular common crew, if not most common crews, should come up more frequently than most, if not all, uncommon crews.  The weighting is supposed to be somewhat in favor of the player because they are spending more uranium, but descriptions from Kixeye are often vague.

“Gearheads isn't the most common crew either, it’s Lucky Bastards at 5.6%, more than any uncommon crew. Which, isn't right at all.” 

While that does fit most of our subjective experiences, it also makes sense that a common crew is the most common to roll of any variety of crew.  I’m more surprised that in that sample, they rolled about 1.65 uncommon crews for every common crew.  

The complaints about Disciples of Skullduggery (DOS) have mostly died down.  But why?  Surely any player that rolled one would brag about it online, right?  Maybe not.  From the field of psychology, “herd mentality” refers to how people are influenced by those around them to adopt certain behaviors.  Basically, peer pressure.  (Don’t do drugs, kids!)  Even a generous estimate of one-third of the total players that are playing BP and frequently roll for crews are on any given facebook page to brag about it mean that if a DOS crew is rolled, it goes unreported two-thirds of the time.  If the person can report it, they may not, because the internet would likely spot hateful, jealous comments at them for their good fortune, and ain’t nobody got time for that negativity!  In addition, confirmation bias states that people would seek out opinions or ideas that match their own.  A big mass of comments on a post that are little more than “I agree” is a great example, and one a lot of people reading this have already seen.  Also, in general, people tend to exaggerate their misfortunes, either unintentionally or intentionally, in order to gain sympathy on the internet, which is not the place one should go for sympathy.  Even if one DOS crew was rolled in that entire sample, the odds of NOT getting one if you tried that number of rolls for yourself are still 36.8%.  Is rolling a DOS hard?  Yes, and it should be.  But I do not yet believe it impossible.  

So, there you have it!  Rolling for a specific crew takes a long time and a lot of uranium.  But you knew that already, right?  Sometimes it takes three full stores of uranium and you don’t get a crew you want, and sometimes it happens on the first roll.  It all averages out in the long run, although even a lifetime may not match up with the specific probabilities crews are assigned.  But with the Tideseeker and 100 and 200 elites to get the sector to orange easily and Ironclads to do DUBs, uranium is a lot easier to get.  Tideseekers do Reaver armadas on auto.  So get your uranium and keep rolling, you might find what you need sooner than you think.  


Wednesday, April 12, 2017

Spy Games

Infiltrating the Espionage Raid


By: George Argyropoulos
a/k/a Dragon_Bane   


Another raid is upon us and people invariably want some direction with regard to prize redemption, so here we are. I'd like to remind everyone that, unless you are sure of your goals and abilities, or have a specific plan in mind, try not to spend any of your raid points until the end. You never know if you are going to get help or find a time and cost effective alternative in the raid. This holds particularly true for low and mid-level players.

Most of the prizes and structure are pretty straightforward this raid so I'm merely going to touch upon a broad picture rather than break down each prize.

Top End :

If you are a top end PvE player, you first must decide what path you will choose for the May raid. Thinking about the next raid before this one even begins? Yes. Kixeye has offered us multiple paths in order to engage these raid targets and depending upon which path you choose, you will need to prioritize what you want and when you want it. This is important because in order to get any of the flagships out in time for VXP weekend, you will need to claim that hull as soon as possible in the raid to have it complete prior to the VXP event. For these players, choosing your path, and the flagship that matches that path, is a key early decision and goal. The sooner, the better in this instance so you can maximize your shipyard time and avoid having to coin the build to get it out in time.

Of note: In the TFC show from Tuesday we were told that if you had the left hand tree completed, you would have access immediately to the unlocked store. This is key if you are following the Icebreaker path and want the Vassago's Icebreaker.

After that decision and expenditure, the raid is your oyster. The Harlock Alpha was 'meh' for me but I do like the new Thrower and Special. Tokens are always a must have and the Charged armors are technically cheaper with the new point structure. You have free reign to follow whatever path you decide, but remember, stick to your plan.

Mid-level :

You are likely using Citadels with a tank for this raid. If the targets hold true to the Preview Servers, you should do well, even if it is a grind. What you may find is that rather than going for Tier completions, you may want to find a target in which you are efficient and farm the hell out of those. In the last preview, Jefe from the BP Crib was able to manage an 81 target for on-the-map instant repair using a Punisher tank and an Hcit/Cit combination. I'm sure as the raid progresses we will hear of good options that are found that you can take advantage of. If this is the case, and you do not have the Monolith, I would suggest the left hand side of the main prize tech tree, the Icebreaker side, OR, if you are running the Empyrean route, the Empyrean flagship is a viable candidate.

If you have the Mono, I think your choice is a little more difficult. I could see players choosing either option at this point, however, unless you have already invested time into the Icebreaker, the Grid Mono/Mono combination seems a bit more practical in terms of points efficiency. If you can pull this off as a mid level player, you will have boosted yourself immensely for May's raid and the FM change after this raid set is completed.

Low-level : 

Again, I am going to presume you are running Citadels with a flag (Pool 1 & 2 in the FM), but not as good of a build as the mid-level players. In this instance, I would start marshaling my points as I could and look to see what is working for other players. My initial gut reaction is that you should try for the Harlock Citadel and Judgement Mortars to bolster your abilities in the next raid. I do wish that the MX series of Armor Specials were available for the low and mid level players in this raid. That would enable you to succeed in a much easier fashion in the May raid. Much like Mid-level players, you need to prioritize your selections so that you can prepare for the May raid and the FM change after this raid set and likely bolster your current FM ability.

Of Note: 

There are a few prizes that are available that some low- and mid-level players may want to look at as well as time and points allow. The Tideseeker is still a good hull to have in the tool box as is the Calamity Scattergun. The Countermeasure items are always a plus when dealing with various targets, particularly Garrison (a/k/a FM) and a couple of good mortars are available as well as the Combustion System 2 which is great to have in the toolbox.

As always,  keep an eye out for tips, tricks and info from the various pages and shows below and from those players that live stream like TSM and Price is Wrong.

The Forsaken Council Raid Help Page
The Forsaken Council
Battle Pirates on BV
Battle Pirates Crib
Alliance Crib
The Forsaken Council Build Page


Playing with Gridiron's Toy

Let's hope Zoe is not the jealous type...


By: George Argyropoulos
a/k/a Dragon_Bane   
NEWEST BUILDhttps://forsakencove.blogspot.com/2017/05/preview.html


In this last update before the Raid, we got to see the final version of the Gridiron Monolith. It is... interesting. On Tuesday's TFC Show we got a little insight as well as an interesting reference to a mechanic of the Gridiron from one of the Developers of Battle Pirates.

After the last Preview Server, where we got a glimpse at the stats, it seemed clear that this hull should be used as a tank for the rest of your Monolith fleet. This was borne out during the show when GD Raikan specifically addressed that topic. He also mentioned an interesting little tidbit about the mechanic of the Gridiron - namely that the buffing field for the other Monos is displaced behind the flag like the Wake Tactical Field on a Monarch. This makes building (and driving) a fleet a tad more complex as the builds have to account for one another while taking this into consideration. I'm not particularly thrilled about the deflection buff NOT being added to the Gridiron, but it is what it is.

In designing this fleet, I went back and forth between the builds to hammer out some key issues and this is what I have for an initial build idea. Lets start with the Gridiron.

Gridiron Monolith:


As we can see, there is a lot going on here. We have the D52-R Missile paired with the Solid Fuel Booster 3 to spot at a range of 98.8. The addition of the Charged M Armor to offset those pesky missiles and a panel of D5-M for the resistance buff as well as a tiny bit of deflection added in.

The Phalanxes and Gails are there for obvious reasons, and the Hailstorm D is there to stagger the Anti-Mortar cycle.

Frontline Countermeasure special is an obvious choice as well as the Hydraulic Resistors and the MX-3 Armor special. I went with Guidance Scrambler over Agility System 4 for build time and, honestly, I did not see a call for the AS4 in these targets. The high velocity rounds is an odd choice, however, I selected it to compliment coverage from the Monoliths in the fleet. It also ensures quicker hits to make the battle a little clearer around your fleet since driving with these will tax your skill if you want to take full advantage of the Flagship's Special Abilities. I AM very tempted to add Thruster 3 in its place, but I think a clearer battlefield may behoove me better. We'll see...

Lastly, we have the Siege Cannon S. I put this on so that the Gridiron will be marginally faster than the Monoliths in the fleet, allowing for, hopefully, an easier time of maneuvering the fleet while also keeping the Monoliths within the 'buff zone' while allowing the fleet to stay 'tight' to maneuver around the mines and map.

Monolith:


This is our DPS hull. The design of the fleet was to have 3 of these to go with the Gridiron. We need to keep this hull behind the Gridiron, in the field the entire time, to take advantage of the splash and critical chance buff of the Gridiron. This build is marginally slower to aid in this. Because we may see some priority targeting in the targets, there is a Charged M armor, some D1-M armors and an MX-3 armor special to buff resistances.

There is a Gail 2 on each of the hulls to stagger and add a bit more coverage for mortars in conjunction with the Gridiron's set-up.

The Combustion System 2, High Velocity Rounds and Viscosity Regulator specials are to maximize damage to the targets and compound with the strength of the Gridiron field and the strength of the O/U mortar. It should make for a powerful combination... if I can drive the bloody things.

I chose to rely on the Combat Mortar O/U - 10 because its characteristics are perfect for the build design and the field that the Gridiron gives, and... critical hits with 150% splash is going to be awesome with this mortar.

Additionally, having only 3 DPS ships allows for the possibility of adding another, secondary, tank to the mix in case future targets have enemy fleets that flank you. You could conceivably run a tank trailing the fleet so that you are not caught with your lead tank out of position in a situation like that.

So - that's the initial thoughts for a build for a Monolith fleet. We have enough tokens to get 3 blank Monoliths out for the VXP weekend and if you can grab the Gridiron on the first day of the raid and then get all the tokens, you could also have that hull out in time for the VXP weekend as well.


Saturday, April 8, 2017

What the hell is a 'Turrent' and how to you build one?

T-U-R-R-E-T : OK?

By: George Argyropoulos
a/k/a Dragon_Bane   


So, yes, it is a pet peeve of mine. I'm no Roger Bell Grammar Nazi (Hi Roger!!), but c'mon people. C'mon. Please? OK, thanks (For fun, see 'The Brian Corner' below). Now then...


We have had a few additions since the last article When you're not sure what to stick where..., namely, the advent of Level 8 turrets and a whole lot of new specials and weapons. Much like that article, this is going to be a brief overview of a few builds and the thought process behind them rather than an in depth technical look at all your options. This is merely meant to give a little insight as to why certain specials are chosen for use with certain weapons.

Some of the new specials add a deeper dimension to your ability to tweak old turrets and, of course, match nicely with the turrets which they were developed to pair with. As with ship builds, there are a myriad ways to build turrets. Let's look at some examples.

Executioner:


Once this was the 'baby' cousin of DEE, the Dead Eye Executioner, however, with the smaller salvo and some specials, this weapon has grown into a very useful turret. Here we have added Thermobaric Casing III for the increase to damage, Fire Support Platform M for both damage and range increase and then we have SSKP Enhancement allowing for retargeting (and presumably ability to hit underwater), reload and accuracy. This turret also has the A-T Transformer I to further increase the damage output.

Draconian Coaxial:


With so many Liberators floating around these days, this is a turret that has climbed into a favored spot with me. The secondary weapon on this is an Anti-missile weapon and unlike other anti-missile weapons, it does not rely upon accuracy, which makes Flak evade a bit of a moot point.

Of note: the secondary weapon is listed as having a multi-shot, however, a multi-shot special will not work on the secondary weapon. What will work though, is splash. Since the weapon is splash based, the bigger the splash, the more missiles it can take out. To that end, we have added the Sulfide Deployer and the Fuel Tank 01-X specials to boost the splash to a whopping 160%. We then added the Countermeasure Targeting special and the A-T:R Transformer to increase the range of the secondary weapon for better coverage. Do not discount the ability of this weapon.

Blunderbuss:


An interesting addition to your frontline or to sneak in somewhere to surprise a fleet or hull that is weak to ballistics. This particular build can be placed in the front to annoy Liberator fleets, yet is utterly useless against Prides. Remember - do not rely on one weapon or type only.

For the Blunderbuss we chose Supercharged EM Rails for its damage output through Critical Hit chance increase and the tripling of the critical hit when successful. The Depleted Uranium Shells III is only there for its damage increase as this weapon is a dumb-fire weapon. The Hydroxide Coated Barrels increases damage output through an increase of 'pellets' in the multi-shot. We also added the A-T:R Transformer so this turret cannot be out ranged by Liberators.

Venom Spitter:


A new kid on the block, the Venom Spitter offers some interesting options. One drawback that I currently see to this weapon is the poor projectile speed. If not placed precisely this weapon (another dumb-fire weapon) will 'miss' fast moving ships.

For this turret we went with Hydroxide Coated Barrels for the same reason as the Blunderbuss build above, the Sulfide Deployer for the reload and splash and the Eruption Pyre for both projectile speed as well as the splash boost. The A-T:R was used for the range boost to avoid sniping of the turret.

Hyena:


Another new kid on the block, this one packs a wallop. On this particular build we went with Thermobaric Casing III for the increase to damage, SSKP Enhancement allowing for retargeting (and presumably ability to hit underwater), reload and accuracy and the Scramjet Engine III for increased range. Added as well is the A-T:R Transformer for additional range.

I hope this quick overview helps some to understand the interactions of various specials and weapons and perhaps gives some people some new ideas for turret builds. As I mentioned before, much like ship builds, there are a LOT of combinations that work and placement is also a key element in base design when trying to tailor a build for a turret.

-----------


The Brian Corner: 

My curiosity got the best of me and I found this in doing some mindless research:

In the English dictionary, allegedly, there are 1186 words that end with "ENT" and only 662 that end with "ET". 
More substantially, 1935 words end in "NT".

Another common typo you may see people make is "ration" instead of "ratio"
That's because only 54 words end in "io". 2776 words can end in "ion".

Typing on a keyboard develops muscle memory. From wiki: "When a movement is repeated over time, a long-term muscle memory is created for that task, eventually allowing it to be performed without conscious effort. "

So it's not surprising that more frequently typed patterns will be observed in typos.
The environment where people are in-game and have to type fast without making a conscious effort will result in these typos... even if they make your eye twitch.

Wednesday, April 5, 2017

Shhhhhh.... TOP SECRTEZ!!!

Preview Adjustments


By: George Argyropoulos
a/k/a Dragon Bane   


So I'll keep this as succinct as possible... for me... I hope... otherwise Mark a/k/a TSM is going to firebomb my house.

We had a preview today and got a chance to try out some builds and some targets. The A set had the 81 and 85 available. The B set... well, I'm not sure. I was multi-tasking and was concentrating on the IB builds and the A set. This is what I ended up with:


I played around with a few builds and believe it or not, this was Build F. I tried with the original build from the last article, and while it was OK, I think the X armors are still not working properly and ended up with this build. The results are below in the video. Enjoy!!


Monday, April 3, 2017

A look at the Icebreaker

What do we do?


By: George Argyropoulos
a/k/a Dragon_Bane


Typically, I have a decent handle on the idea behind a build I want to pursue earlier than this. Quite honestly, I was holding off a bit to see if we got a test server (thankfully we did) and I was likely going to wait and do an Anatomy of Design article for this hull after the raid.

Unfortunately, there has been a little bit of a clamor with regard to build direction and design because we have not had the same transparency we had last year. Add to that the fact that our build time seems to have been contracted and it feels like we are a little bit under the gun.


Before I get into the build, I would like to address the time imbalance many of us are facing. To wit:


  • March 16 : Raid starts. Give yourself a day to get your 90 or so million.
  • March 17 : Start building your blank IBs. Blanks with Officer and R&D take 4D 17H.
    (Total required : ~20 Days - link)
  • March 17-23 : 7 days of build time
  • ~12 days of tokens in the raid
    (1 Day deficit - saved token or coin to get it out for VXP)

So after we rank these puppies, which was a pain without a weapon, we continue (assuming no charged armors, because, 200 million points):


  • March 24-25 - VXP - Rank them while using the shipyard for something else. Net loss of 2 days.
  • March 26-April 12 - 18 days of build time ; 18 Days of Tokens available in the FM - 36 total days of build time available.
  • Refit to blanks: 47 Days 9 Hours
    (11D 9H deficit - link)


This is exacerbated by any of number of factors. I think the biggest one is that there was a week less of FM because of the way the calendar fell this month (long month leading into a short, weeks wise), in conjunction with 4 new Tier 5 FM prizes following the raid. It's one of those 'Perfect Storm' scenarios.

Because of this, even if you had earned the hull on the first day of the raid, you are likely going to fall short of a fleet of just 4 for the raid. This exacerbates the issue even more, because of the calendar issue, you are in an even worse position if you didn't get the points required on day one, already had a ship already in the Yard or not up to date on your FM? If you are in any of these positions, you likely won't even get 3 ships out the door.

(Side rant: Additionally, during this entire time span you are precluded from building anything else. No tweaking a guard to adjust for anything. No catching up on a fleet for any of your chores. No building or tweaking of your PvP stuff at all, nor any of your PvE stuff. The calendar really boned us this month.)

I would like to implore Kixeye to look at this and maybe possibly offer us some avenue with which we could catch up without having to resort to buying into a special offer. Perhaps a TLC or some other avenue so that we can actually have this fleet out the door and ready to participate in the raid. Particularly as the new hull is coming out this week and all these fleets will transition into our FM fleets. When normally successful top end PvE players are noticing this sort of disparity in the timeline, something may have gone off-track a little... like this article. So where was I? Oh, right...


Ok, Icebreaker...


Daniel Baker (a/k/a Peg Leg II) was kind enough to forward me a chart similar to the one above which got me thinking about the stacking bonus and how it would relate to a build. I know that a lot of people are hesitant to use the Charged Armors, but because of the stacking bonus, it seems as though these hulls were designed to use them, particularly if you are running four hulls. Hopefully the issue with the charged armors is resolved before the raid. That said, my current plan is this:

THE BUILD HAS CHANGED, PLEASE READ: Shhhhhh.... TOP SECRTEZ!!!


Some of this is a risk, but given the above information, it seems like the only logical path. I will test a few other builds out during the raid as well, but for now, this is the load out.

1. Weapons : The  D-100S Siege Rocket is a given here. The question becomes one of balance with regard to the other weapon slots. The addition of the Gale 3 is to help give the fleet some 'breathing room' when trying to maneuver - particularly against the fleets we saw in the preview server.

2. Armor : This is a tricky one. Given the findings in the chart above, it seems clear that this hull was designed to utilize Charged Armor. Using them seems a little bit of a risk currently, but as I said before, I hope these are corrected before the raid. If you do not have Charged Armor, I would stick with the D1 versions of armor and have them retrofitted to the max in your Retrofit Lab.

3. Specials : These afford some tuning options, and I went with the following...


  • Alloy Armor MX-3 : This will bring your resistances up a good notch, however, given the stacking bonuses as evidenced in the chart above, and depending on what we see in the targets, you may be able to swap out something else. This would be heavily dependent upon the target, but I could foresee using Guidance Scrambler 3 or something similar if the targets afford us the opportunity at damage mitigation through good driving. Something to keep in mind.
  • Explosive System IV : This one is used to increase the splash of the rockets while pulling in the spread a little bit. I was a little torn between this and Combustion System 2, however, given the large inherent spread of the weapon, I chose to go this route.
  • Garrison Battery MK-X : The clear choice for Turret Defense given the weapon of choice for this hull and the buffs to that weapon that this special provides.
  • Hydraulic Resistors :  My all-time favorite special that Kix has produced. I only wish there were more opportunities to acquire it. We did see Torpedo Turrets in the preview, though they weren't firing. I expect them to work normally during the raid.
4. Last minute tuning : I left these two spots open. The weapon slot I left so that I can add what I want once I have seen all of the targets. In the preview server I had used Trident Missiles for their Counter-measure ability of shooting down rockets. They are not a cure for them, however, given the size of the target we have seen, over time, this should help mitigate overall damage from Coldsnaps if there are targets in which we can not avoid them. 

The special slot is currently reserved for the High Yield Warheads special that we are expecting to come out in the TLC this week. The splash, building and wall damage buffs we saw in the preview server mesh very well with this hull.


And that's it. That is the current plan leading into the raid. Again, some of this build is a little risky and some of it does put some faith into Kixeye to sort out the Charged Armor issue as it seems this hull was designed around them. Hope this helps some of you and/or gives some of you ideas.


Saturday, April 1, 2017

Gluttony - Grease Monkey of the Sea

Feed the Power...


By: George Argyropoulos
a/k/a Dragon_Bane   


The Gluttony drops and... Wow. I'm trying to not say Power Creep, but... uh... Wow. I shall name it the Grease Monkey of the Sea (GMotS).

So the new Gluttony has a brand new mechanic. It essentially is a Medic mechanic that you see in many other games, giving its health up to damaged friendlies. The rate of this transfer is 6,000 health per 4 seconds for an average mitigation factor of 1,500 health per second. That's... interesting. Let's look at the new mechanics.


- Transfer Amount : This is how much health can be transferred to a friendly ship. It is the actual amount transferred (you'll understand why I say this in a minute). The Gluttony transfers up to 6,000 heath per transfer. The Gluttony can only 'heal' Conqueror or Defender class hulls. It CAN NOT heal another Gluttony.

- Transfer Rate : This is how often, in time, health can be transferred. The rate for the Gluttony is every 4 seconds. Another way to look at this is that it can mitigate 1,500 DPS (damage per second).

- Number of Targets : This is the number of friendly ships it can impart health to if they are in range. The Gluttony can impart health to up to 2 ships if they are in its field of effect. This means it would transfer 6,000 health to each ship for a total of 12,000 health transferred. If there are more than two damaged ships in its field, the Gluttony will heal the two with the lowest percentage amounts of health .

- Transfer Efficiency : Everything has a cost, right? That applies here as well. The 'cost' to transfer in the case of the Gluttony is health. The cost is calculated by using an efficiency ratio. The Gluttony's efficiency ratio is .95:1. For every 6,000 it transfers, it costs 6,315.7 health. Additionally, the Gluttony will not trigger a repair unless the target ship(s) have sustained at least 6,000 damage and at least one of them has sustained a minimum of 10% damage. I am still testing the latter part of this mechanic- It seems that it may be that the trigger is only that 10% damage threshold. Either way, keep this in mind when using the GMotS.

So now that we have seen the stats, why is this such a powerful hull?

On first blush, I thought of Base Defense. This thing sitting behind a Vanquisher and Alpha would make an interesting trifecta.

Builds are an interesting option. Loading this up with the new special, Speed System 5 and the new Deep Sea Countermeasures gives you just about that 6 day build that the tokens provide and you mostly maintain the abnormally low repair coefficient that is inherent to the Gluttony. Adding armor will allow you more transfers, but will severely impact that repair coefficient - even if using the Scourge Cadmium Delta armor. Balancing this will depend primarily upon your intended use.

Another option is to tank up a Conqueror and blast through defenses with 2 or 3 of these trailing with a Liberator or two following for clean up. You could also use it to stand off some Oppressors and heal them as the take splash damage from Cataclysm mortars.

The hull is a very interesting one, and one that opens up a lot of possibilities. It also will make for some interesting driving in base hits and will make base prepping a little more interesting for some.

What do you think? How will you use it? How have you used it? Share below in the comments!

Crews..or as we say down here in the south Krewe's!!

Rogue (not rouge) Crews


By: Robyn Piatt

a/k/a Robyn_P

There are two things to remember with crews. How bonuses are applied and how to use a crew for maximum effectiveness. 


Crew Bonuses


Each crew has a bonus, some have more than one bonus and some have bonuses that apply to specific or "Favored" hulls. 

Looking at some of the differences with crew bonuses.

Remote Raiders 


On this crew we see multiple bonuses. Some are specific and some are not.

The 30% ship combat speed is not specific and would apply to all ships in the fleet for the duration of the battle.
The Drone bonuses would only apply to ships with Drones


Bullseye Brigade

On this crew we see a bonus where Cannons, missiles and torpedoes will always hit enemy ships. This bonus applies to all ships.

There is also a Favored Ship bonus.

The bonuses listed under the favored hull apply ONLY to the favored hull.  These ships get an extra bonus when using this crew. 


Junk Yard Dogs 

This crew has a bonus at the top but it's restricted.  The Bonus only applies to fleets in the base guard.  If you use this crew on any other fleet eg. in the FM, the bonuses are ignored. 

It also has a favored hull bonus for the Goliath.


There are also some instances where a bonus does not apply. These are defense bonuses. A defense bonus does not apply to a hull that has 100% defense handicap, these are some of the Conqueror and Defender hulls in play at this time. 


Hidden Bonuses


When looking at a crew, look at all of the bonuses and look at where a bonus may benefit you in an area of the game not necessarily in line with the bonus. A good example of this is the Salty Dogs crew. Although this crew at first glance looks like its just for ranking, there is a secondary bonus under the favored hull that is often forgotten. This bonus applies to any Forsaken hull and gives 15% Reload and Turn Speed. These extras can be particularly helpful if you are using a crew on a ship that is not fully ranked yet or one to which you want to add some reload (eg. Apollos).  


Doubling up on Crews


You can run a crew on your fleet and have another crew activated in a blank fleet slot in your base.  Lets say you are hitting a raid target and you are running a Demolition Squad crew.  You get hit by lag and your fleet dies.  When you bring your fleet back to your base, you remove the ships from the current fleet and add them to an empty fleet slot and load up a Grease Monkey crew. You repair your fleet using the Grease Monkey half repair and then remove them and put them back into the slot that has the Demo Squad. You then launch as normal. This allows you to use two crews at the same time, saving on damage and repairs. This process works really well during the VXP weekends.


Crew Matrix


I have created a matrix that lists all current crews as well as some key bonuses that can be applied in different applications.  Below is a sample page. You can access the full document on the TFC website here.


Hopefully this will help with deciding on what crew to use and when. Remember you can get a free crew daily from the Arena and from the Great Hall.  

If you are able to get Uranium on a regular basis then get into the habit of using crews. Some crews have bonuses that can make or break a TLC or a Raid. 

- Robyn - Who feels nekked if she is not sporting a crew on the fleet.